Tuesday, November 29, 2011

Winter Star


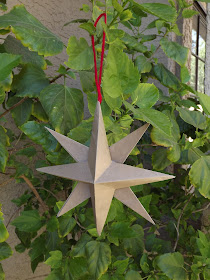
 This is a really fun and easy craft with endless possibilities. Here's a few ideas and the steps to make this star. This one I made out of a paper grocery bag:


origami winter star, paper star,paper crafts, how to fold a paper star


2" square paper attached to a pin  inserted into the cork.


paper winter star, how to make a paper star
Attach to gifts.


origami stars
My 7 year old loved these and we hung them over his bottom bunk.


folded origami paper star garland
String them together to make a garland.


paper starI
Tree ornament....

This seems like a lot of steps, but I tend to overdo instructions. This will be quick and painless, if you decide to give it a go.
Here I'm using a scrap piece of 8x10 paper. I folded it in half and the cut along the fold.

The paper for the star needs to be SQUARE. To get a square form a rectangle you just need to: 1. fold a triangle. 2. Cut off paper left under the fold. 3. There. A square!

You already folded a triangle in the step above, with your paper open fold a triangle using the other two corners. Open paper and fold up and in half. Open paper and fold to the side in half.

Your square should have creases like the ones above. Now, following the dotted lines from the picture on the left, cut along the creases almost halfway to the center of the square. With the bad side of the paper facing up, fold the corners into points with the inside edges of the points lining up with the diagonal creases. They do not overlap.They meet.

The paper should still lie flat after all the corners are folded. Use a glue stick to add glue to the top of only one side of the point then place the other half of the point on top of the glue and press. It helps to have a finger inside the point.

Here is how it looks with all points glued. From the bottom and top. If you want to add ribbon or string them together, this is the time to add that. Place the string or ribbon into the point before you glue it closed.

Fix any of the creases so they are straight and then use a glue gun to glue the backs of the stars together. They barely touch each other in the back, so you might need a few big globs of glue to get them to stick. And....That's It!!! You're Finished! You Made It!!

Now you have a beautiful winter star. I think a patterned or striped paper would look really pretty. Or gold, silver, glitter, painted.........
The possibilities are endless! Have fun and Happy Winter!!

Friday, November 25, 2011

A Handmade Mini Wreath


I'm not a big Christmas knickknack collector, but I ALWAYS love a wreath and these are easy and free! I started out making these for some lanterns I have outside and ended up putting them on the kitchen cabinets.


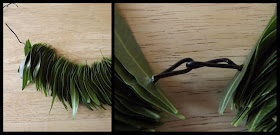
 I used leaves from four different plants: Olive branches, Rosemary branches, Indian Laurel leaves, and African Sumac leaves.
After you have your leaves or branches, all you need are some wires (I salvaged mine from the impossible packaging that kids' toys come in), dollar store suction hooks, ( you could use the mini Command hooks, I've seen them at the dollar stores too), and a glue gun which isn't necessary. I just used it cause it makes me feel CRAFTY!


For the wreaths where I threaded the leaves, I used a wire about a foot long and just threaded it until it was almost full. Then hooked the ends of the wire together and tied a bow over the hook. For the Olive Tree and Rosemary branches, I cut a branch about a foot long and twist tied the ends together and then wrapped more branches around the circle.


I used a glue gun on the threaded wreaths to keep the top leaves from flopping over and the glue also doubled as a way to hang the wreath on the hook.


Happy Holidays!

Thursday, November 24, 2011

Desert House Den


Because this room has the computer, TV, and a PlayStation, it is the mancave and takes a beating. It is small and cozy and was easy to fill up.


gallery wall

This room is just off the living room. It used to have solid french doors, we added the glass paned doors and hardwood floors.


gallery wall


An IKEA dining hutch from several years ago.


All the gaming equipment is stored behind these sliding doors.


gallery wall

Thursday, November 17, 2011

New Light On Trial

I've now got a light hanging where there has been nothing for so long that now I'm not sure I'm digging it. Nothing new because I'm very wishy washy anyway. But when I look at it I'm 50/50 on weather or not I like a hanging light in this spot. I've got the ladder another week, so the pressure is on to decide.
I went back to the Home Depot to look again at the lights I talked about in the prior post and they all seemed too small for the space. But...I thought I could go a whole different direction and not fill the space at all by buying the bare bulb light that was this:

Kinda fun, right? It has the vintage bulb which is the thing that most drew me to these lights. I had Mr. Husband with me and he didn't hate it...which translates to "hooray, it's mine!" But then if it was going to come to this light AND to pay $79 for it (c'mon it's just a light bulb on a $2 light kit) my el cheapo mind started churning and I remembered that we have a work light similar to this in the garage. We could hang THAT and buy only the overpriced $9 vintage light bulb!!!??!!
The bad news is that I'm not sure I like anything hanging there. The good news is that if I take it down, I know I'm done with lights up there for a while and I'm not going to obsess about it. It's out of my system! really!


This is the stylish $2 outdoor light that I have over the front door, so obviously I am lacking the Liberace gene.

Monday, November 14, 2011

Home Depot Can Be Dangerous?

I can't go to Home Depot without seeing something I want that has nothing to do with the original reason I entered the darn store. I had to stop by there to get some caulk to fill in some of the many cracks in the drywall way, way up in part of the 20+ft ceiling that hasn't been touched in over 15 years because we don't have a ladder that tall. Side notes: we borrowed a friggin tall ladder O'death and I wandered around Home Depot for about 20 minutes looking for the caulk section because I didn't want to ask one of the cute Home Depot guys, "where's your caulk? (childish giggle)" While I was strolling around Home Depot I came across some really nice, and new to me, pendant lights. So... we've borrowed a ladder for a few days and IF I'm going to add a light to a ceiling that I won't be able to get to again for another 15 years, NOW would be the time to do that!!!! Right??
I know, I know...how will I change the light bulb(s)? I'm still in the honeymoon phase and am not thinking about that yet.
Lemme show you what has been there for the last 15 years:
When I first moved here there was a hideous cowboy chandelier hanging, on a hideous chain, all the way down to, and almost touching, the dining room table. I borrowed a ladder and because I couldn't reach the wiring with two hands and still balance on the ladder, I just CUT the chandelier down and undid the electric wiring in the wall-light-switch for safety. But yesterday, we tried, and my tall husband said he'd be able to reach the wires if I want to add a light. So... I could get rid of the sad remnant of once was.

Here's some of what I saw [whilst looking for caulk ;)] that I liked. I love the vintage bulbs the first row comes with:
 The star is so cute but it's $461. Not gonna happen. This idea is on a whim and I'm going to keep it below $100 (the rest of the lights are around $75), if I do anything. I like the industrial look and love the vintage light bulb in the cage, but how would I get to the bulb let alone change it?! Maybe they are all too small??

Also, this space doesn't really need light, It just might be a nice change to hang something.

I'd also like to add this:
Not the fan. The wood. You know, since we have the ladder a few days...and we're doing stuff up there already...???? Love Love Love It!


Actually, I've been feeling BLAH about this house lately. For many reasons, but a few are rising HOA dues (every freaking year) and too much time fantasizing on (the grass is always greener...) Zillow. So I don't really feel much like putting one more cent into this house, but I've felt this way about this house many times before and I'm still here, 15 years later...

Friday, November 11, 2011

Ten June Final Week Photo Challenge


This is the final week of the Ten June 30 Day Photo Challenge. I have had such a great time getting to know everybody! I'm so sad it's over. Thanks so much to Michelle at Ten June for hosting this party. It was the push I needed to get to know my camera better.


25. Something Pink


26. Close Up


palm
27. From A Distance


28. Flowers


wood pile, stack of wood
29. Black And White


30. Self-Portrait

25. Pink Lantana in the garden.
26. Close up of silverware in kitchen.
27. Palm trees at the mall.
28. Some flowers in the living room.
29. Wood pile next to the fireplace. Made it black and white using Picnic.
30. Self portrait. Used Picnic to remove some color saturation and made it grainy with the HDR effect.


Because I love Picnic Collage, here's a re-cap of my 30 days of photos...


It has been so much fun getting to know everybody through their photographs. Thanks for a great experience!